
In my line of heavily regulated work which is under constant supervision and scrutiny of governing bodies such as OSHA, CAP, NCCLS, ASCP, FDA, etc., there is rare opportunity for a general lab person like myself to invent anything usable at the lab bench. But, if you work in a Laboratory analyzing hundreds of urine specimens and bubbles at the meniscus are a problem; like this was to me...then you need the De-Bubbler. This device doesn't slice or dice, it doesn't burn toast or cut through tin cans like a hot knife through butter. It won't even link your facebook fan page to your blog. But, it will remove those pesky bubbles floating on top of urine samples.
Why the De-Bubbler came about?
Some urine analyzers in clinical laboratories are sensitive to formed bubbles on top of or at the meniscus of the urine sample. The instrument I was managing at the time was the Bayer-Siemans Clinitek Atlas which is a major workhorse of high production rapid urinalysis testing. The De-Bubbler is also well suited for the Sysmex UF-100 Urine Sediment Analyzer as well. These two instruments have an aspiration pipette dipping down into the specimen to aspirate urine which will be tested for various analytes to show urinary/kidney function. When the pipette encounters bubbles, the level sensor detects the bubble and stops the pipette from lowering further into the specimen; aspiration then sucks up air instead of sample for testing. This can result in an aspiration error, partial results for the test panel, or a failed test; all requiring repeat testing, wasted reagent, and wasted technologist time. Removing the bubbles from the specimen is the only way to prepare the urine sample for efficient testing yielding accurate reliable results. The process used to remove the bubbles involved plastic disposable transfer pipettes; one pipette per specimen done by hand. The Techs used 600-1000 transfer pipettes per day. That was a great amount of waste and time consuming activity.
With the De-Bubbler, you can efficiently, rapidly, and precisely remove pesky bubbles from urine samples before you test. With some materials commonly found in a clinical laboratory and a few purchased items - you too can build yourself a De-Bubbler. And, if you act now, you can build two De-Bubblers to meet the needs of your lab. Wait! There's more. If you tell 5 co-workers about this device...Alright, enough of that jazz.
You want a De-Bubbler? Here is what you need and how to run/maintain it.

2-large glass erlenmeyer flasks (2000 mL size) one with perpendicular side arm nipple/one without
1- rubber stopper; with two holes for tubing, must fit snuggly in mouth of the flasks
1- rubber stopper; with one hole for tubing, must fit snuggly in mouth of the flasks
(Can also be done with 2- regular flasks and 2 - two hole stoppers)
3 - 5 mL plastic serological pipettes (disposable kind)
6-8 ft. rubber tubing with inside diameter big enough to fit snuggly on 5 mL pipette and the flask nipple
1- vacuum pump capable of reaching at least 25 inches of vacuum aspiration (preferably with adjustable vacuum).
Any brand 1000 ul. size pipette tip (MLA type works); must fit snuggly on end of rubber tubing
1- wire coat hanger
Regular pliers
cutting blade/utility knife
Some oil type lubricant; makes the 5 mL. pipette insertion into stoppers easier
Cloth reinforced work or garden gloves
The above is the material list I used for constructing a De-Bubbler device. In the laboratory I worked at, I had most items already available in storerooms and around lab benches except for the rubber stoppers which I ordered from a scientific lab supply company.
Constructing your De-Bubbler:
1. Don the garden gloves while pushing the 5 mL. disposable pipettes through the rubber stoppers. Place a small amount of lubricant to ease the insertion into the rubber stoppers. Be Careful! whether using plastic or glass pipettes, shattering can cause laceration or other injury.
Place stoppers in each flask. Flask#2 will have two 5 mL. pipettes, one sitting lower then the other.
Attach rubber tubing to the side arm nipple of flask #1. Cut length about 2 ft long or so depending on how much rubber tubing you have. Size appropriately to side arm and inlet on the vacuum pump.
Attach tubing to one of the 5 mL pipettes in 2nd stopper. Cut length of tubing just long enough to connect flask #1 to flask #2. Connect free end of this tubing to 5 mL pipette on flask #1.
Attach another length of rubber tubing to 2nd 5 mL pipette in flask #2. This should be cut to length no more than 3 - 4 ft long. Insert free end of tubing into a plastic 1000 uL size pipette tip.
Your device should look like this when you are complete...
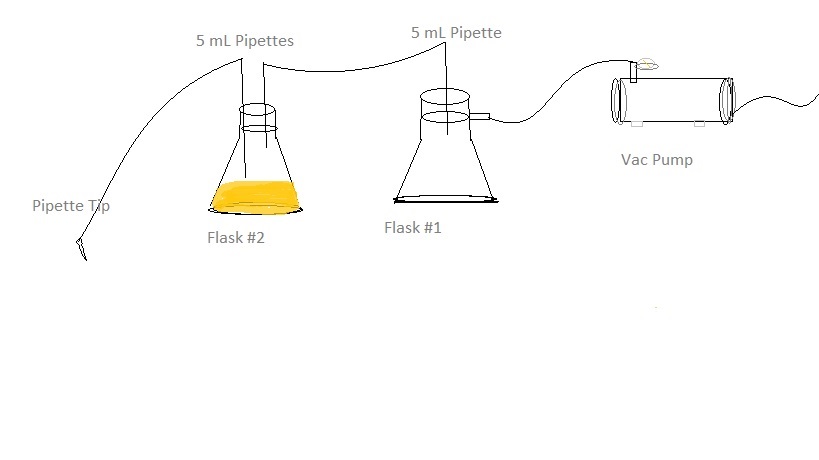
During operation of the De-Bubbler, tubing with the pipette tip is used to swirl at the meniscus of the urine sample. Bubbles will be quickly aspirated from the specimen. Fluid will aspirate up the tubing which will collect into flask#2. If the flow is slow and back-flow or gurgling occurs, increase the vacuum regulator on the vacuum pump. Normal operation will be maintained at 20-25 " vacuum. Fluid will collect in flask#2 but should not collect in flask#1. Flask#2 should be emptied before fluid level reaches pipette connecting with tubing to flask#1. The 5 mL pipette connected to the rubber tubing with aspirator pipette tip should sit lower in the flask than the pipette connecting via tubing to flask#1. As an added safety to protect the vacuum pump a disposable air filter can be placed on the tubing connecting flask#1 to the vacuum pump just before the pump inlet. That is it.
Validation work done with this device design concluded that no specimen to specimen contamination was present for any measured analytes tested in a standard urinalysis bio-chemical panel and microscopic or flow-cytometrical analysis.
A word about safety and contamination: This device is designed to collect urine bubble fluid and urine which will collect in flask#2. As such this creates a bio-hazard risk and any handling of the components should be done by trained clinical laboratory professionals wearing appropriate PPE (Personal Protective Equipment) including latex or vinyl gloves, lab coat, and eye protection; at a minimum. Some components are glass and care should be used when handling and cleaning all the glass components to prevent injury, laceration from broken glass, and bio-hazard exposure. Any chipped, cracked, or stressed glass or plastic components should be replaced with new perfect condition parts. As always, follow good laboratory practices and assume all specimens have the potential to transmit disease including Hepatitis and HIV.
As a precautionary measure, a small amount of bleach (40-50 mL.) can be added to flask#2 after emptying collected urine and cleaning. General laboratory grade glassware cleanser can be used to soak components for thorough cleaning maintenance.
There you have it lab folks. The De-Bubbler. Behold, use it, save money with it, and for goodness sake save the planet already. I may be losing my hair, [not intent on spraying shoe polish on my head though], but my wife is losing her mind - over me and my antics.
Good day my friends. Ssssslurp!
No comments:
Post a Comment